


Have you ever heard the lovely romantic sound of crackling wood wick candles burning? It's awesome and with a few bucks for a pack of wood wicks (can be bought at any craft store or online) and a little time, you can have beautiful new candles with the stuff most people throw out after using.
I like to save all my old jar candles with the little bit of wax left at the end, used scented wax cubes, and any candles that don't burn properly, or melted and have seen better days.


The first step is to remove all wicks, wrappers, metal wick clips in the bottom of candles, and any other debris you don't want floating around in your new candles. Also clean any black smoke soot from the inside of the used jar with a paper towel or baby wipe. Tip: Candle labels/stickers on the jar will easily come off once they have been heated and sitting in the boiling water in a later step, so I don't bother removing those until later. I like to separate into piles, like colors and scents that will blend well together, to have a plan for my new candles.

Next is to take a large pot, fill it with water and bring to a low boil. You don't have to use an old pot because no wax will be melted in it.
Take the jars you wish to fill with wax to make the new candles, and pack in as much old used wax as you can. Do not add the wick at this point. Don't worry about the gaps between the wax because as it melts down, you will continue to add wax pieces as they are melting.

Carefully place the jars filled with old wax into the boiling pot of water. Give it a few minutes to melt down, and keep adding wax pieces until it is filled an inch or so from the top of the jar.
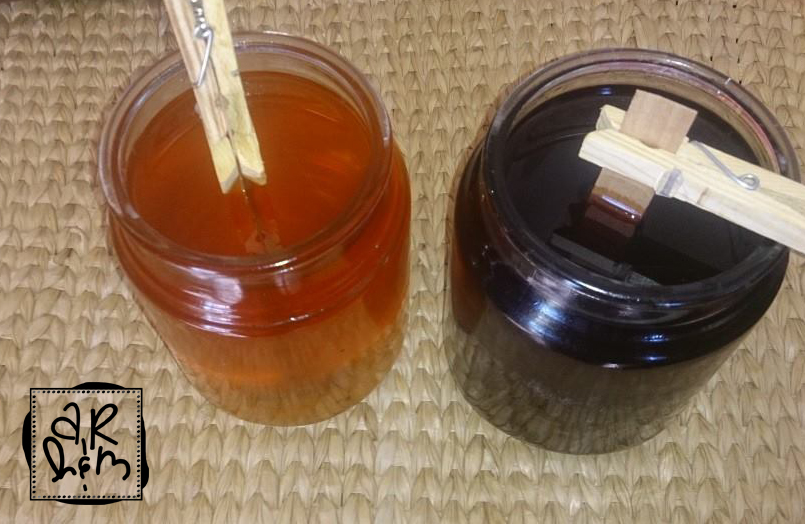
 |
| This is the same jar that I added more wax to about every five minutes as the wax melted down. |


Next take your package of wood wicks and clip the wood into the metal clip that came with the wicks. Now you can push the wood wick (metal clip to the bottom of the jar) into the center of the melted candle wax. I like to use clothes pins to weigh and balance the wick to make sure it stays centered as the wax hardens.

Once the wax has completely hardened (this may take an hour or two) you can trim the excess wood from the wick. You now have new upcycled crackling wood wick jar candles! They sound, look, and smell so pretty!


I Don't know where to get the wood wicks for the candles ? Do you make them? Thanks
ReplyDeleteThis is very interesting post, different from other Jar Candles blog. Well done. thanks for sharing
ReplyDeleteSuch a great information on Wholesale Candles . Also helpful to search and full details on Wholesale Candles. Thanks for it...
ReplyDeleteYou have shared very interesting blog. I like it. Thank you so much for sharing with us.
ReplyDeletesend flowers to india
send cakes to india
nice a blogs and good information.
ReplyDeletewrite for us
loved this blog,amazing. thanks for sharing this information with us.
ReplyDeletefor more exciting offer https://giftzbag.com/online-gift-delivery-jaipur/
My wood wicks seem to be going out all the time any suggestions?
ReplyDeleteI save all my candle wax and I currently have a big juice tin full and at least 3 empty candle jars to use so as soon as the holiday is over I'll be making new candles
ReplyDelete